This quick guide shows you how to move a Local Save onto your The Forest Server
Click here to order your The Forest server with AA Game Hosting today!
Moving a local save onto your The Forest server is a great way to continue your single‑player or co‑op progress in a dedicated multiplayer world. Whether you’re migrating an established base, bringing over a long‑running playthrough, or setting up a shared environment for friends, uploading your existing save lets you pick up exactly where you left off. This process is straightforward once you know which files to copy and where they need to go on the server. In this guide, you’ll learn how to transfer your local save to your The Forest server so you can keep building, exploring, and surviving in the same world, now with the flexibility and stability of a dedicated server.
Uploading an Existing Save to Your The Forest Server
You can continue your existing world on your server by uploading your local save file. The Forest keeps both single‑player and multiplayer saves in the AppData directory, and both formats are supported.
1. Open Windows Explorer and go to C:\Users\<User>\AppData\LocalLow\SKS\TheForest.
2. Select and open the folder that contains a long sequence of numbers.
3. Select either the SinglePlayer or Multiplayer folder, depending on which mode you were playing.
4. Select and copy the Slot # folder containing the save you plan to upload.
5. Upload the Slot # folder to your server’s Multiplayer directory using the File Manager or an FTP client.
6. Navigate to Configuration Files and open the Server.cfg file using the Config Editor.
Enter the name of the uploaded save slot in the Save Slot field, then set the Init Type dropdown to Continue Your Current Save.
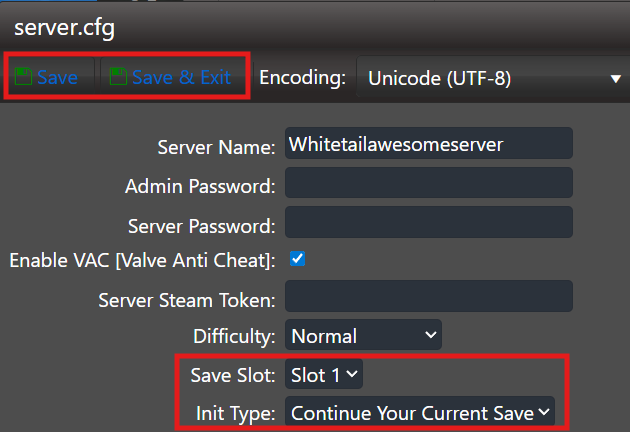
7. Click Save, and afterward restart your server to load the updated settings.

Did the above information not work for you?
Please click here to contact our support via a ticket.
