![]()
This guide will help you with installing and Setting Up LuckPerms on your Hytale Server.
Click here to order your Hytale server with AA Game Hosting today!
Installing and configuring LuckPerms on a Hytale server is one of the most important steps in building a stable, well‑organized multiplayer environment. LuckPerms gives you fine‑grained control over permissions, ranks, and player roles, allowing you to shape how your community interacts with the world you’re creating. Whether you’re running a small private server for friends or preparing a large public community, a solid permissions system ensures consistency, security, and a smoother experience for everyone. LuckPerms stands out because it’s fast, flexible, and highly customizable. It supports multiple storage options, integrates with common admin tools, and provides both in‑game and web‑based editors. Once installed, you can define staff roles, create progression‑based ranks, restrict access to commands, and manage permissions across plugins or mods with ease. This guide walks you through the installation process, initial setup, and best practices for organizing your permission structure so your Hytale server is ready for growth and long‑term stability.
Configuring LuckPerms for Your Hytale Server
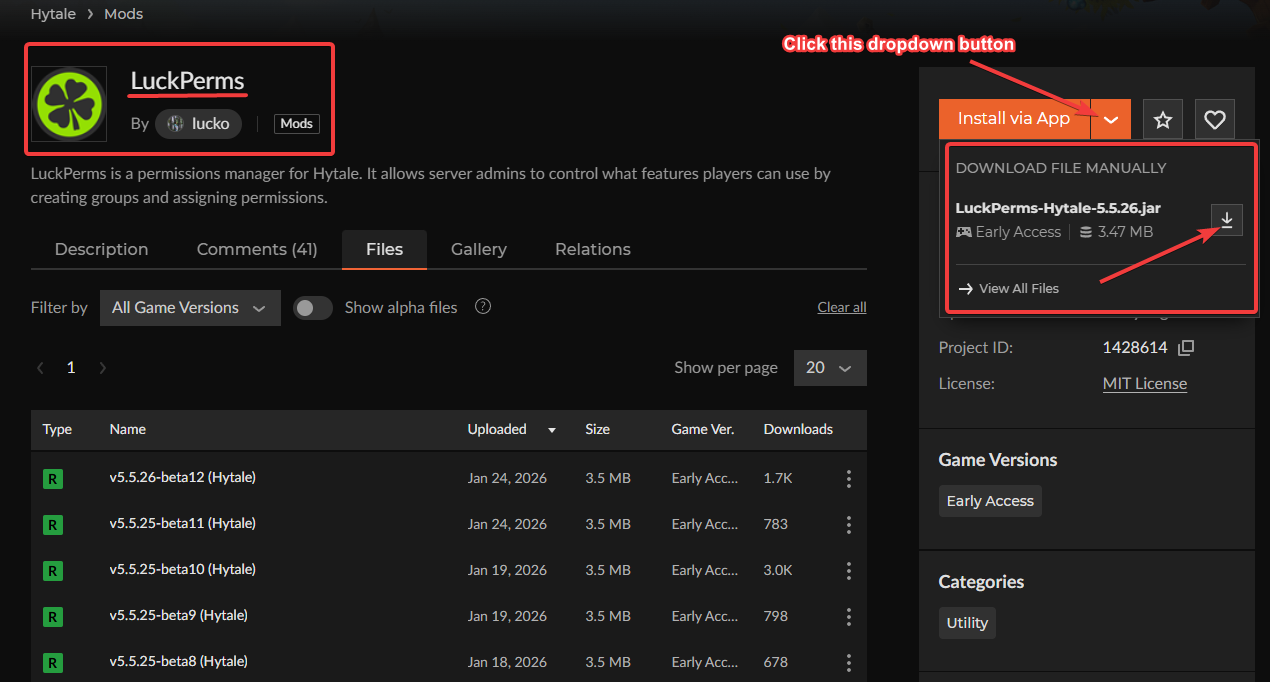
1. Download the LuckPerms mod from the official source to ensure you’re using the latest, most secure version.
2. Log in to your Game Control Panel and navigate to your service.
3. Before making any modifications, stop the server from running by clicking the Stop button.

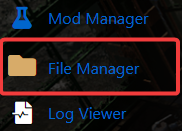
4. Navigate to the File Manager Tab.
5. From the File Manager tab, locate the mods folder and upload the LuckPerms .jar file to add it to your server.
For uploading the file, it’s best to use an FTP client such as FileZilla, as it provides faster, more reliable transfers, especially for larger mods or multiple files.
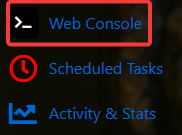
6. Confirm that the LuckPerms mod is running by opening the Web Console tab and checking for successful startup messages indicating that the plugin has loaded without errors.

7. To configure LuckPerms directly in‑game, use the following command:
This command generates a temporary web editor link that lets you manage groups, permissions, tracks, and user assignments through an intuitive interface.
NOTE
To give a player unrestricted access to all available commands, run the following command:
/lp user <playername> permission set *
This permission level should be assigned only to highly trusted administrators or server owners, as it grants complete control over the server and all of its functions.
8. To open the LuckPerms web editor, enter the following command:
/lp editor
This command generates a link to the LuckPerms web editor, allowing you to manage and customize permissions through a clean, user‑friendly interface.
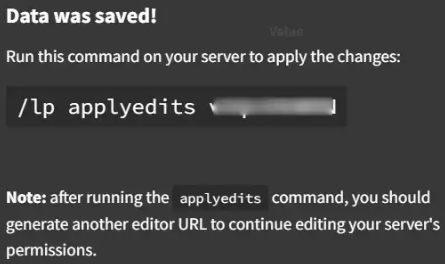
9. Open the generated editor link, then copy the command shown in your browser.

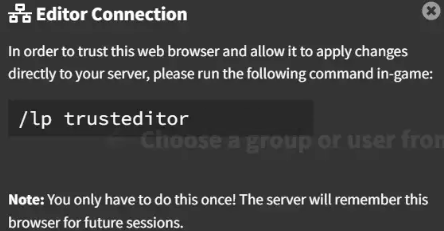
10. Paste the link into the in‑game console.
![]()
11. Once you’re connected, return to the LuckPerms editor, configure the permissions you want for your players or groups, and then apply the changes.
Setting Up an Admin Group with LuckPerms on Your Hytale Server
1. Log in to your Game Control Panel and navigate to your service.
2. Before making any modifications, stop the server from running by clicking the Stop button.
3. Navigate to the Web-Console Tab.
4. Open the LuckPerms web editor by entering the following command:
/lp editor
5. Open the generated editor link, then copy the command that appears in your browser.
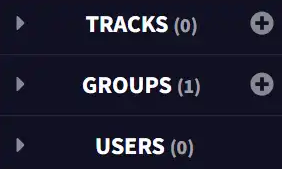
6. In the Groups tab, click the + (plus) icon to create a new group. This gives you a clean starting point to define a custom set of permissions and roles tailored to your server.
![]()
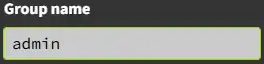
7. Enter admin in the Group Name field.
8. Fill in any additional details you want to include, then click Add Group to complete the setup.
| Option | Description |
| Group name | The code name of the group. |
| Display name | Shows how Luckperms displays the group. |
| Weight | The priority level compared to other groups. |
| Parent | Inherits permissions from another group. |
| Prefix/Suffix | Inserts tags before or after a player's name. |
This adds your new group to the list, making it ready for you to tailor with the specific permissions you need.
9. In the Groups tab, select admin from the list. In the Add permissions field, enter hytale.*.
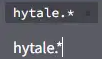
Note: Using the hytale.* permission grants the group all available permissions. For tighter control, assign individual permissions manually so you can define exactly what each group is allowed to do.
10. Click the + Add button to include the new permission or setting in your group.

11. In the Users tab, select the player you want to manage. If the player doesn’t appear in the list, you can assign them to a group manually by using the add parent command in the server console.
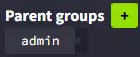
12. Next to Parent Groups, click the + icon to add a new parent group, then select Admin. After the Admin group has been added, click Apply to save the changes.
This lets you place the user into an existing group, so they automatically inherit the permissions and roles defined for that group.
13. Click Apply if you’re prompted to copy an apply link, then paste that link into the server console to complete the update.
This applies the changes you made in the LuckPerms editor directly to your Hytale server, ensuring the updated permissions and group assignments take effect immediately.
Admin‑Ready LuckPerms Commands for Streamlined Permissions
| Command | Description |
/lp user <playername> parent add <group> |
Adds the player to the group permissions. |
/lp user <playername> parent remove <group> |
Removes the player from the group permissions. |
/lp user <playername> permission set <permission> |
Grants permission to the player. |
/lp user <playername> permission unset <permission> |
Removes the permission from the player. |
/lp group <group> permission set <permission> |
Grants permission to the group. |
/lp group <group> permission unset <permission> |
Removes the permission from the group. |
Did the above information not work for you?
Please click here to contact our support via a ticket.
