This guide will show you how to change the mission (scenario) on your ArmA Reforger server by updating the scenarioId in the configuration file.
Use this to load official or custom missions for different gameplay experiences.
How to Change Missions in Arma Reforger Server
Open your Game Panel and navigate to your Arma Reforger Server.
Open Configuration Files and navigate to the server_config.json
Open the server_config.json via a Text Editor

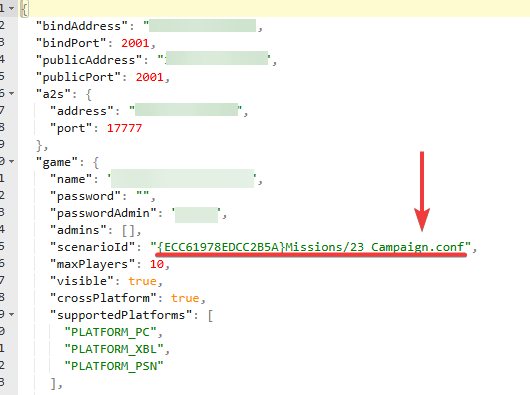
Find the scenarioId Line
Look for the line that says "scenarioId": "some_scenario_name".
Replace the current ID with the new scenario ID you want to use.
See the list of official scenarios and their corresponding IDs (below)
| Name of scenario | Scenario ID |
| Conflict – Everon | {ECC61978EDCC2B5A}Missions/23_Campaign.conf |
| Game Master – Everon | {59AD59368755F41A}Missions/21_GM_Eden.conf |
| Tutorial | {90F086877C27B6F6}Missions/99_Tutorial.conf |
| Game Master – Arland | {2BBBE828037C6F4B}Missions/22_GM_Arland.conf |
| Conflict: St. Philippe & Morton | {C700DB41F0C546E1}Missions/23_Campaign_NorthCentral.conf |
| Conflict: Morton & St. Pierre | {28802845ADA64D52}Missions/23_Campaign_SWCoast.conf |
| Combat Ops: Arland | {DAA03C6E6099D50F}Missions/24_CombatOps.conf |
| Conflict: Arland | {C41618FD18E9D714}Missions/23_Campaign_Arland.conf |
After editing, save the file to apply your changes.
Go back to your game panel and restart the server so the new mission loads.
Your Arma Reforger server should now load the new mission.
